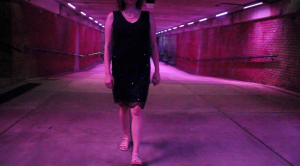
My favorite shot in the short film, “Zelda, Almost Home.” The tunnel leads to Riverfront Park in Montgomery, Alabama.
A short film about Zelda Sayre Fitzgerald and a ghostly return home.
The premise for the short film Zelda, Almost Home is quite simple: Zelda Sayre Fitzgerald, born in Montgomery, Alabama in 1900, lived a wild and tumultuous life with the author of The Great Gatsby, F. Scott Fitzgerald, whom she met in 1918. What if she returns still as a ghost?
The inspiration to shoot Zelda, Almost Home came from watching Vincent Laforet’s Reverie on YouTube. You’ll also notice there’s a hat tip to Damien Chazelle and his film La La Land— Zelda walks in front of a mural. Simon Cade from DSLR Guide has been a big influence and coach as well. (This is my first short film. I’m 51 years old.)
Come to find out, there are ample stories around Montgomery already to suggest the premise for this film is dead on. The halls of Baldwin Middle School are full of stories alleging apparitions of Zelda. As I talked with F. Scott and Zelda Fitzgerald Museum Executive Director Sara Powell last Friday, had two more accounts, recent ones, as the museum prepares to open upstairs rooms as a bed and breakfast.
So as you read and watch the film, please know, that it is grounded in much less fantasy than you might first suspect.
The Making of Zelda, Almost Home
One of the first things any viewer will note is the music, Almost Home, composed by Moby and used with permission from his website, MobyGratis.com. He offers free use of his material provided it’s used for purposes like this—non-commercial and creative expression.
The film is shot entirely in Montgomery, Alabama, from June 22-25, 2017. And that is part of my commentary for shooting this, there are almost no films about Montgomery that are actually SHOT in Montgomery.
It is all shot with a Canon D60, part with a Nifty Fifty lens, and part with an 18-135 mm. The camera for the most part is mounted on a Neewer Image Stabilizer. Shots from the car the camera was mounted on a tripod.
Shot List
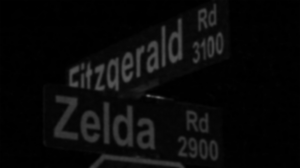
The intersection of Zelda and Fitzgerald, Montgomery
The street sign on the corner of Zelda and Fitzgerald in Montgomery, Alabama.
The opening shot is designed to give homage to Montgomery for honoring Scott and Zelda, while also having our Zelda set the scene that she was full of life when she lived here. It is not hard to imagine the real Zelda spinning around her street sign with glee.
Five minutes after we left the scene, I drove back through and someone had called Montgomery Police to investigate what we were doing. A patrol car was sitting where I’d been parked and was using the lights of the car to light up the street sign.
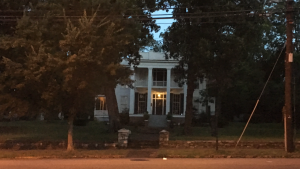
Scott and Zelda Fitzgerald Museum, Felder Avenue
The house on Felder is now a museum. They have a fascinating collection of Fitzgerald memorabilia and are open every day of the week except Monday for tours. And they are in the process of opening an upstairs suite as a bed and breakfast so those seeking inspiration for their writing or filmmaking can soon stay in the same rooms as the Fitzgeralds for nine months back in the 1920s. This is said to be the longest the two lived anywhere together. And it was the last place they ever lived as a family.
Winter Place, Goldthwaite, and Mildred
It is often said that Scott and Zelda met at the Montgomery Country Club. But lore now suggests in fact that they met at Winter Place on Goldthwaite. Part of the tale goes is that Zelda’s daddy, Judge Anthony D. Sayre, who lived four blocks away, would not have approved of her being at Winter Place so saying they met at the country club was much more proper.
The McBryde-Screws-Tyson House, Mildred
Christian Lowry, the owner of the house, tells the tale that Zelda was friends with the girls who lived there at the time. He says Zelda used a ring she’d been given by Scott to carve their initials in a second-story window. Mr. Winter, who owned Winter Place across the street, is said to have had a thing for Ms. Zelda when she was younger and so as an admirer when McBryde-Screws-Tyson lies vacant, he sent men into the home to extract with window pane Zelda carved initials into.
The McBride-Screws-Tyson House in Montgomery, Alabama.
It is hoped, that since Mr. Winter was something of a packrat, as Winter Place goes through renovation, the original piece of glass will be found and hopefully returned to its rightful window.
But this is the sentimental importance of this shot in the film.
*I have been spelling McBryde with an I instead of Y. That’s now corrected on June 30, 2017, though I can’t change it in the YouTube post.
The Train Shed
There are stories about Zelda and the train shed in Montgomery. It was the prime way in and out of town for Zelda and Scott. But it is also said that she dressed down one day and walked around with a tin can seeking donations. News of this, of course, stirred Judge Sayre. Which is probably what it was meant to do.
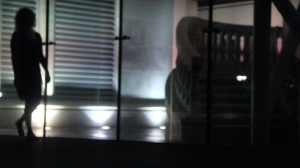
The Riverfront Tunnel
The Riverfront Tunnel has changed over the years. Only recent efforts by the city to bring nightlife back downtown has led to the amazing lighting in the tunnel. The colored lights and the depth of the shot make this one of my favorite scenes in the film. I thought about going back and having Zelda walk perfectly framed up the lighted tunnel but then it’d be too staged and too fashioned, something the true Zelda would not allow.
Tallapoosa Street
This is one of the apex locations in downtown Montgomery, connecting with Commerce Street, critical to the city’s past and present.
The Alley
Over the past 15 years, the Alley has really come to life as an attraction in Montgomery, and wherever there was a party in this town, well, it’d attract Zelda.
Tallapoosa and Commerce Statue of Hank Williams
The Hank Williams Statue is now the gateway into the Riverfront Park area of the downtown area.
RSA Tower Fountain on Dexter Avenue
David Bronner has built a series of buildings throughout Montgomery over the past 40 years. The fountain this Zelda moves around was not here when the real Zelda lived. But my character couldn’t resist the temptation to play. She really wanted to get into the water like the real Zelda would have done in New York minute.
Catoma Street view of Troy State
Troy State wasn’t located here back in the day but is an important part of the downtown scene, connected to the Davis Theatre and across the street from the Jefferson Hotel where Scott and Zelda are said to have stayed, as well as being near the Rosa Parks Museum, which I believe back in the day was also the Empire Theatre, one of the first air-conditioned places in the hot of the South.
Sunny Paulk Civil Rights Mural, Lee and Montgomery Streets
Hat tip to La La Land and having Emma Stone walk past the You Are The Star Mural. Montgomery has a beautiful Civil Rights Mural here and we just had to include it. Zelda was gone before all of that came to be and so it was fitting for her to just walk past.
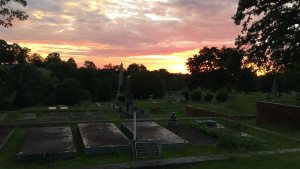
Oakwood Cemetery, Plot 28, graves of Minnie and Judge Anthony D. Sayre
There is a memorial plaque for Scott and Zelda, their daughter Scottie Smith, and Zelda’s parents, Minnie and Anthony D. Sayre in Oakwood Cemetery. When we arrived for shooting, the sunset was alive with color and emotion.
The first shot is of Zelda mourning over the plaque. She then runs her hands over the stone above her father’s tomb. Out of love and emotion, the Zelda character in the film lies down on the stone above Minnie and puts her hand on Minnie’s name. By then it was too late to see, but the poignancy should not be lost. Zelda would dearly miss her Momma for many reasons all of us would.
Old Alabama Supreme Court Building, Dexter Avenue
Justice Sayre served on the Alabama Supreme Court from 1909 to 1931. Zelda would visit this place and miss her daddy.
Old Alabama Supreme Court Building.
The Alabama Capitol
The Capitol is just a stone’s throw from the Old Supreme Court Building.
Chris’ Hotdogs, Dexter Avenue
Chris’s Hotdogs is 100 years old this year. I don’t know if Zelda ever went there to eat before she left town, but the odds are pretty good that she would have. They have served every sitting Alabama governor since they opened. It makes sense the lead Flapper Girl would have been a customer, too.
Court Street Fountain
Many a girl like Zelda has climbed the fence at the fountain to wade into its waters looking down Commerce Street toward the Alabama Riverfront and up Dexter Avenue toward the Capitol.
Sunroom window, The Fitzgerald Museum
The sunroom at the museum would hold special value to Zelda. Scottie, their daughter, wrote about its importance during the Christmas the family spent in the home. As a ghost looking back, she would totally take time to look into this room and remember the gem of joy they experienced there as a family for one of the few times ever.
The Museum at night, Felder Avenue
Day or night, the museum is a treasure of Montgomery.
My Own Zelda Ghost Story
So, the night before we began shooting while walking up the drive to the museum, a white and tan cat came running out of nowhere and up to me. I am allergic to cats and don’t care for them. This one, as I was standing in the drive looking at shots, avoided my Zelda actor, (Angie Tatum Weed) and began curling around my legs. I finally said, “Hey Zelda!” and the cat stopped.
I have 51 days left to finish revising my novel writing for The Voodoo Hill Explorer Club and to turn it in to SMU’s The Writer’s Path program.
I have spent time each of the past few days with iPad Pro and Apple Pencil in Adobe Sketch and in Notes drawing out scenes and characters of my book. Why would I devote time to draw when I’m in a writing medium?
Creative writing is NOT about capturing emotions on paper. Not expressly. Creative writing IS about drawing word pictures with words. If you aren’t telling a story with word pictures, you’re locked into telling your readers how you or your character feels. And that’s BORING.
So I have been stepping back from the keyboard and spending more time focusing on what I could see if I was in the scene with my characters. Not how I feel, that I’m mad that Rose dumped Kirk for Billy Banks, or that Billy Banks is a bully, or Billy’s mom is pretty hot. Those things can be told by drawing word pictures that set the scene. How does a character move his/her face? How are they sitting? Are they biting their lip?
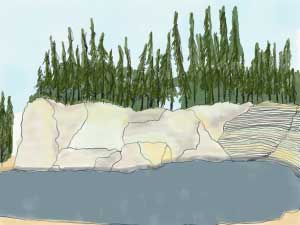
Creating ‘Little Laughing Whitefish Falls.’
The Little Laughing Whitefish Falls, KI Sawyer AFB. Drawing by Donald J Claxton for The Voodoo Hill Explorer Club.
A crucial piece of the work is Little Laughing Whitefish Falls. The problem is, that there is no such place outside the back gate of KI Sawyer AFB in 1977. There is Laughing Whitefish Falls, which is a beautiful place. But there is no Chimney Rock and a lagoon where kids of all ages can jump from four levels into the water. The highest height is called The Devil’s Ledge. It’s 55-feet above the water.
Blend all that together and you have a whole new fictional place to build some incredibly important scenes around in The Voodoo Hill Explorer Club. I wind up using the lagoon from behind it, under it, down the face of it, and from the four levels to jump.
So I decided if I’m going to write about it, I need to SEE what it looks like. The only real way to do that is to blend elements of each place into a piece of art. And this is where the drawing of the Little Laughing Whitefish Falls came from.
Consider giving this a try to boost your writing.
You might try doing this, too, for your own writing.
It doesn’t have to look like a Norman Rockwell piece of art. It just needs to have enough visual cues in it that will prompt you in your writing, to help you draw better, more convincing word pictures and leave the emotional dumps and figuring out to the imaginations of your readers. They’ll love you for it. They will.
Premiere Pro CC Multi-Cam Monitor has been moved from WINDOW to Project Monitor.
For those of you who might have switched over to Premiere Pro CC and be thinking you’re crazy when trying to switch over to Multi-Camera Monitor and it’s not there under window, well, it’s been moved. You have to go to the top right corner of the Project Monitor and click the drop down and then switch over. And it’s working funky at that. Doing a ` to get the MC Monitor to go full screen still leaves one of the cam views half cut off. It’s late, I know, so maybe I’m missing the obvious, but alas, this is a big change from CS6.
We’ve had a great 24 hours of creative development using the newly released Adobe Creative Cloud CS6 tools uploaded for public use and consumption on May 11, 2012. At the end of Day One, it still feels like Christmas Morning.
Last week we began a major HTML 5 overhaul of our site and refocused our company’s mission on the niche industry of interactive books for the iPad. We still do PR and we still do web design, startups and photography and video work. But going forward, our primary focus is on “making things glow.”
And so today we’ve posted a new video bumper you will begin seeing in all Claxton Creative, LLC produced videos. This 12-second video is the result of multiple hours of testing, designing, editing, experimenting, reformatting and at times, near frustration. But alas. We have something designed we are quite proud to show.
The tools used to make this piece included Photoshop Extended CS6, Illustrator CS6, Premier Pro CS6 and Media Encoder CS6 from Adobe. The audio tracks were built using Garage Band and they were all put together using a 17″ 2.4 Ghz Intel Core i7 with 8 GB 1333 MHzRAM.
Yesterday we upgraded the RAM from the standard 4 GB that the machine came with to 8 GB through a purchase from Crucial.
The only issue we have had yet was when we tried to do a lot of sound editing in Premier Pro yesterday and it kept crashing. But it appears that we should really have been using Audition CS6 instead, so maybe that’s the rub. We’ll see.
But all in all, we could not be happier with the release of all of these incredible tools, and for us, because we already owned Photoshop CS4, are only costing us $29.99 per month for one year. Hopefully, we’ll be selling interactive books for the iPad at the rate of a bazillion a day by next May and we won’t really worry about it going to $49.99 a month…
Since my posts from earlier last week about the lessons I’ve learned about printing, (when I took a Scott Kelby class in Arlington in January, I left early and regret that now, but there was a serious Net Safety issue going on at the time.) and the tricks that can be done to enlarge a RAW digital photo, I’ve had a few requests for more information about how to do a pretty cool trick that Scott apparently learned from the world-famous nature photographer Vincent Versace.
As a rule, even after owning my Nikon D-40 for almost three years now, I shoot EVERYTHING I shoot in RAW format. And because it takes up as much memory as it does anyway, I don’t have it do the dual deal where it saves in RAW and .jpeg. What’s the point? If I’m going to do something with a print, it’s most likely going to wind up as a .tiff or a .png anyways.
Repeatedly you’ve heard me say how happy I am that I’m a Mac. Apple has devised a great photo management program called Aperture. I have version 2, but version 3 has been released. Version 2 is doing all I need it to already, so I’ve not upgraded. So, when I get back to my Mac from a photo shoot, I connect it to the Mac and it begins to talk to the Nikon. This triggers Aperture 2 to open and a dialogue box opens allowing me to import my pictures, still in a hi-res format.
It’s in Aperture that I do most of my coloring adjustments, such as fixing the exposure, highlights, white balance, etc. Even without additional plug-ins, I can add a vignetting affect if I so desire.
When I’ve done what I need to in Aperture and if say, I want to have the print done poster size or say, 11 x 14, then I’ve got to make some adjustments.
As you can see, there are short cuts in Apertureto getting a picture over into Photoshop. (The long way is to export the file to a folder or desktop, then move it over into Photoshop.) But why do that when there’s a short cut. Here, look, all it takes is Shift+Command+O on a Mac.
Photoshop
Once in Photoshop, this is where the enlarging process takes place. Some might say, this is where the magic happens, but I don’t want to suggest that Aperture isn’t as powerful as it is. Yes, I could use Adobe Bridge, and maybe the filing structure is a little easier, but I made the change from Bridge to Aperture about 38,000 frames ago.
In this photo, you’ll see the top dialogue box is pre-set at 1,998 pixels by 3,024. And then the Document size dialogue portion says the picture at present is 6.66 inches by 10.08. Another important point is that the Resolution is set at 300 and the bottom drop down box is set to Bicubic (best for smooth gradients.)
Each of these points are important to keep in mind as you go about enlarging a photo. Obviously, you can see that even at 10 inches, the photo isn’t going to print out and fit in an 8 x 10 frame. Until I started trying to print 8 x 10 prints a few weeks ago on MPIX, I don’t think I really understood why this was the case. I learned when I went to Hobby Lobby and asked to get mats done for 8 x 10 prints. The problem is that at 8 x 10 a mat isn’t going to be even on top and on the sides when you try to frame it.
If you took this photo as it is now, you could get a framer, say Hobby Lobby, to put a nice mat around this photo, with equal borders all around, and then stick it in an 11 x 14 frame, etc. (Like I said, I shouldn’t have left Scott Kelby in Arlington when I did back in January. Maybe this would have penetrated my thick skull at that point.
Changes we want to make
So our next step involves this same dialogue box. We need to make some adjustments.
I said above we were going for 11 x 16 for this print. (In case you’re still wanting to get a print for a photo frame of 11 x 14, this 11 x 16.06 still is what you need. When you order the prints at 11 x 14, you’re going to be able to shave off some of the top and bottom, but your widths are going to be where you want them.
So, I’ve entered that in the Document Size boxes for height and width.
An important Kelby/Versace secret here is to boost the resolution from the 72 or 300 that previously was there all the way up to 360. This is crucial and as Kelby notes, it runs counter to everything most photographers have been taught. But I have happy prints I’ve now delivered to clients and they’re all happy with the looks of their enlarged prints.
Now, we’re still not done so hang on. See the drop down box at the bottom of the dialogue screen? Do the drop down and pull down to Bicubic Sharper (best for resolution.) Click and release.
Kelby swears by this method. He says that in his discussions with Versace that this very simple effect is as good as you’d get if you dropped some more cash on a Photoshop plugin, and we all know, those often are a couple hundred bucks. So, if this works, why get one?
Ready for Printing
Unless you’re going to make some more adjustments, you’re pretty much ready to save the print and send it over to MPIX and place your order.
Like I said, I ordered prints this way and I have to say, their quality was quite sharp. For ships and giggles, I probably need to do a test of one with and one without. But then Scott Kelby recommended this as did Versace. And I don’t dare, with my limited but growing knowledge, dare question either of them at this point.
Try it out yourself. Let me know how it works.
Next up: Adding a Watermark and Copyright information to your prints you want to put online so no one pirates your hard work.
New Products in The Timberlander Treasures Gift Shop! Wooden custom crosses, Great Pyrenees t-shirts, The Timberlander merch, woodcarvings and more. You'll like what you find here! Dismiss