Since my posts from earlier last week about the lessons I’ve learned about printing, (when I took a Scott Kelby class in Arlington in January, I left early and regret that now, but there was a serious Net Safety issue going on at the time.) and the tricks that can be done to enlarge a RAW digital photo, I’ve had a few requests for more information about how to do a pretty cool trick that Scott apparently learned from the world-famous nature photographer Vincent Versace.
As a rule, even after owning my Nikon D-40 for almost three years now, I shoot EVERYTHING I shoot in RAW format. And because it takes up as much memory as it does anyway, I don’t have it do the dual deal where it saves in RAW and .jpeg. What’s the point? If I’m going to do something with a print, it’s most likely going to wind up as a .tiff or a .png anyways.
Repeatedly you’ve heard me say how happy I am that I’m a Mac. Apple has devised a great photo management program called Aperture. I have version 2, but version 3 has been released. Version 2 is doing all I need it to already, so I’ve not upgraded. So, when I get back to my Mac from a photo shoot, I connect it to the Mac and it begins to talk to the Nikon. This triggers Aperture 2 to open and a dialogue box opens allowing me to import my pictures, still in a hi-res format.
It’s in Aperture that I do most of my coloring adjustments, such as fixing the exposure, highlights, white balance, etc. Even without additional plug-ins, I can add a vignetting affect if I so desire.
When I’ve done what I need to in Aperture and if say, I want to have the print done poster size or say, 11 x 14, then I’ve got to make some adjustments.
As you can see, there are short cuts in Aperture to getting a picture over into Photoshop. (The long way is to export the file to a folder or desktop, then move it over into Photoshop.) But why do that when there’s a short cut. Here, look, all it takes is Shift+Command+O on a Mac.
Photoshop
Once in Photoshop,
In this photo, you’ll see the top dialogue box is pre-set at 1,998 pixels by 3,024. And then the Document size dialogue portion says the picture at present is 6.66 inches by 10.08. Another important point is that the Resolution is set at 300 and the bottom drop down box is set to Bicubic (best for smooth gradients.)
Each of these points are important to keep in mind as you go about enlarging a photo. Obviously, you can see that even at 10 inches, the photo isn’t going to print out and fit in an 8 x 10 frame. Until I started trying to print 8 x 10 prints a few weeks ago on MPIX, I don’t think I really understood why this was the case. I learned when I went to Hobby Lobby and asked to get mats done for 8 x 10 prints. The problem is that at 8 x 10 a mat isn’t going to be even on top and on the sides when you try to frame it.
If you took this photo as it is now, you could get a framer, say Hobby Lobby, to put a nice mat around this photo, with equal borders all around, and then stick it in an 11 x 14 frame, etc. (Like I said, I shouldn’t have left Scott Kelby in Arlington when I did back in January. Maybe this would have penetrated my thick skull at that point.
Changes we want to make
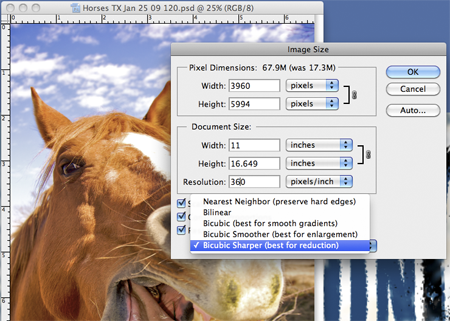
So our next step involves this same dialogue box. We need to make some adjustments.
I said above we were going for 11 x 16 for this print. (In case you’re still wanting to get a print for a photo frame of 11 x 14, this 11 x 16.06 still is what you need. When you order the prints at 11 x 14, you’re going to be able to shave off some of the top and bottom, but your widths are going to be where you want them.
So, I’ve entered that in the Document Size boxes for height and width.
An important Kelby/Versace secret here is to boost the resolution from the 72 or 300 that previously was there all the way up to 360. This is crucial and as Kelby notes, it runs counter to everything most photographers have been taught. But I have happy prints I’ve now delivered to clients and they’re all happy with the looks of their enlarged prints.
Now, we’re still not done so hang on. See the drop down box at the bottom of the dialogue screen? Do the drop down and pull down to Bicubic Sharper (best for resolution.) Click and release.
Kelby swears by this method. He says that in his discussions with Versace that this very simple effect is as good as you’d get if you dropped some more cash on a Photoshop plugin, and we all know, those often are a couple hundred bucks. So, if this works, why get one?
Ready for Printing
Unless you’re going to make some more adjustments, you’re pretty much ready to save the print and send it over to MPIX and place your order.
Like I said, I ordered prints this way and I have to say, their quality was quite sharp. For ships and giggles, I probably need to do a test of one with and one without. But then Scott Kelby recommended this as did Versace. And I don’t dare, with my limited but growing knowledge, dare question either of them at this point.
Try it out yourself. Let me know how it works.
Next up: Adding a Watermark and Copyright information to your prints you want to put online so no one pirates your hard work.


Thanks for some quality points there. I am kind of new to online , so I printed this off to put in my file, any better way to go about keeping track of it then printing?