I enjoy woodworking, where craftsmanship and creativity blend to shape functional and aesthetically pleasing pieces.
Today, I want to briefly outline eight reasons for constructing the Rex Krueger Minimum Timber Bench in the enchanting backdrop of Michigan’s Upper Peninsula woods.
This project captured my attention for several reasons, ranging from its simplicity and minimalism to the opportunity of enhancing my craftsman skills before taking on some important timber framing projects and more.
Rex Krueger’s Minimum Timber Bench
Brief Overview of the Rex Krueger Minimum Timber Bench
He does a great job of showcasing tools that are handy in all workshops, and he also taught me some of the tricks to find the wide array of vintage hand tools I now employ in almost all of my woodworking projects.
The Minimum Timber Bench is a renowned design concept developed by woodworking expert Rex Krueger. The design embodies simplicity at its finest, featuring a straightforward structure crafted solely from timber components. This minimalist approach not only enhances the bench’s functionality but also celebrates the natural beauty and versatility of wood as a material.
Setting the Scene in the woods of the UP.
If you’ve spent any time on this site, you know I love the magnificence of Michigan’s Upper Peninsula! Think dense forests dominated by towering red maples, white oaks, and big white pines that sway gently with each passing breeze.
For me, the UP woods hold an allure unmatched by any other location. They inspire tranquility and foster an appreciation for nature’s wonders. Within this stunning landscape, I am enjoying my second long summer on family land.
One thing I desperately need to continue building in the woods is a sturdy woodworking bench.
Constructing the Rex Krueger Minimum Timber Bench is more than a mere woodworking project. While it is an opportunity to connect with nature on a profound level, this is also a necessity.
Reason 1: Simplicity and Minimalism
Exploring the concept behind minimal timber benches
On Rex’s YouTube channel and website, he features many woodworking projects. This is what the man does. And he’s good at what he makes and funny in his videos. Rex emphasizes minimalism in all of his designs. Best of all, he offers designs for free and for purchase on his site.
The plans for this bench set me back a whole $15. Not bad.
Materials? Well, many I’ve already gathered, but let’s put the price somewhere around $65.
Rex’s design philosophy embraces simplicity and functionality.
When it comes to furniture, minimalism seeks to eliminate unnecessary ornamentation and focus on clean lines and practicality. The concept of a minimal timber bench embodies this ideology perfectly.
Through the use of simple joinery and straight cuts, this bench will achieve elegant simplicity and elevate form and function.
Whether used in a rustic cabin tucked away in the UP woods or as an accent piece in a contemporary urban setting, this bench effortlessly complements my surroundings.
Reason 2: Utilizing Local Resources
Highlighting the Abundance of Timber in the UP Woods
In the vast expanse of the UP woods, where nature unveils its captivating beauty, lies an abundant resource that has stood tall for centuries – timber. The sprawling forest where I’m camping covers the landscape, offering an opportune time to tap into the bountiful source of raw materials around me.
Emphasizing Sustainability and Reducing Environmental Impact
In today’s off-grid living world, sustainability is a term often used to describe almost everything.
But I’m not using wood harvested from our woods on this project.
That will come with future projects. But to get to the point where I can focus on sustainability and use wood from the land, I have dozens of smaller projects needing completion before moving forward.
Reason 3: Cost-effectiveness
Discussing how building a minimum timber bench saves money compared to buying one
One of the primary reasons why I’ve chosen to build a Rex Krueger Minimum Timber Bench is the significant cost savings it offers compared to purchasing a ready-made bench.
Commercially available benches, particularly those made from high-quality materials, are out of my budget range, and even building this bench is pushing it. But as I keep repeating, this is a necessity. A chicken and egg thing.
Rex is saving me a substantial amount of money. Plus, building my own bench allows me to tailor it to my specific needs and preferences. This ensures that every dollar spent is an investment in a tool that suits my needs.
Reason 4: Customization
As with all of Rex’s projects, he leaves room for the builder to customize almost every aspect of a build.
One can decide upon the dimensions and proportions to selecting the type and finish of wood, every detail can be tailored to reflect your personal style and complement its surroundings.
Whether it’s adjusting the height for ergonomic purposes or adding extra storage compartments beneath the seat, you can adapt the design based on functionality.
For those who enjoy gardening, incorporating removable planters along the sides or integrating hooks for hanging tools can transform your bench into a versatile gardening station.
I also make wooden custom crosses from the maple, oak, and pine from the land.
Skill Development
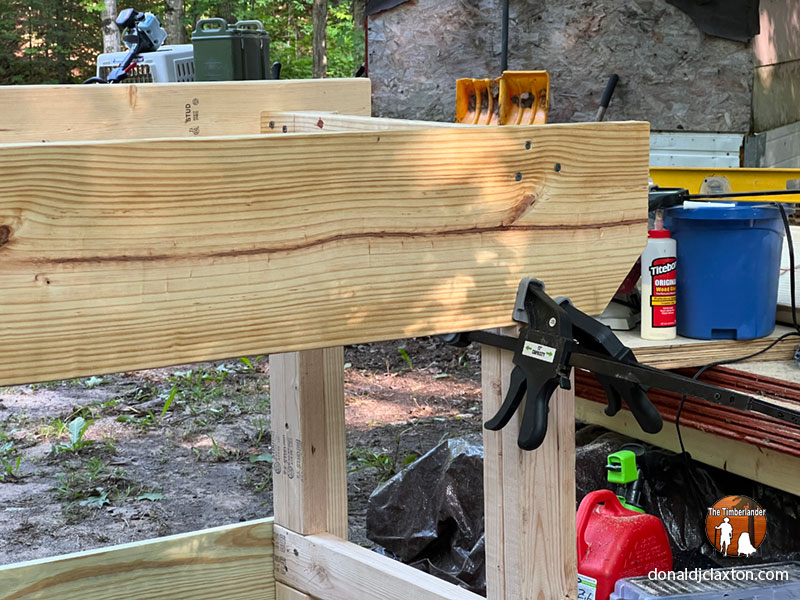
I’m using a mix of power tools and vintage hand tools to make this Rex Krueger Minimum Timber Bench.
The Art of Woodworking: A Journey of Mastery
Building this bench, as well as some of Rex’s other projects, presents the opportunity to delve into the art of woodworking. (I built his shave horse over the winter. It’s with me here in the woods and it works so well!)
With this project, creativity and craftsmanship blend together seamlessly.
Whether you are a seasoned woodworker or a novice, constructing your own bench offers a valuable practical experience that expands your skill set.
Woodworking is an ancient craft that has stood the test of time, and by undertaking this project, you will learn fundamental techniques that have been refined over centuries. From understanding how to measure and cut timber accurately to mastering joinery methods like mortise and tenon or dovetail joints, each step along the way will deepen your understanding of this intricate discipline.
The Satisfaction of Handcrafted Creations
There is an undeniable sense of fulfillment that accompanies the creation of something with your own hands.
In our fast-paced modern society, where instant gratification often takes precedence, engaging in a project like building a minimum timber bench provides an escape from the digital realm and allows for a genuine connection with physical materials.
I’ve enjoyed building this bench; my lower back, eh, not so much!
But the satisfaction is building. Through the main tent window last night, I looked up toward my build site and the only thing I could see in the darkness of the woods was my bench!
I promise, if you build a bench like this you will watch the structure come together harmoniously as a functional piece of furniture, and in the process, experience an indescribable satisfaction.
Reason 6: Durability
Explaining how well-constructed timber benches can withstand harsh weather conditions in the UP Woods
For my situation, I need a bench that is durable. The rugged and unpredictable weather conditions of the UP pose significant challenges to outdoor furniture.
This morning, I’m headed to Lowe’s in Marquette to get an additional box of deck screws and some stain.
While I could have made the whole thing with pressure-treated lumber, I chose to save dollars and then seal it with stain and lacquer.
This should help with resisting damage caused by moisture, temperature fluctuations, and pests.
Last year I learned a lot about what it takes for a wood project to endure the UP’s heavy rain, snowfall, or intense sunlight.
Reason 7: Portability
A Bench That Travels
Once I complete this bench, the next two projects are the construction of 2-wheel and 4-wheel carts.
You see, it’s rained so darned much since we arrived in early July that we got massively stuck one-day last week and we’ve not been able to drive down to the campsite since.
I like keeping the car close to the tents given that we have acquired a pesky black bear that keeps coming round. This is also practical for if the weather gets really bad, Maycee and I can exit the tent and hop in.
But no mas!
Not with the muddy conditions we’ve encountered lately.
So, the carts are going to help me move the bench to where I need it most, but they’re also going to help me move the boards I have on-site ready to build a 12′ x 16′ shed/cabin. With my back as bad as it is, there’s no way I can pull 4′ x 8′ tongue and groove boards across the site and up a slight hill.
Strapping what needs to hauling to the four-wheel cart will be quite handy.
Placing the 4′ x 8’s on the two-wheeler, about mid-way along the bottom of each sheet, will give me leverage to move them and guide moving them from behind as I roll them up the hill.
Can’t build the carts without the bench. Can’t make wood crosses without the bench. Can’t sharpen my tools. Can’t make a new 2-3/8s x 60″ pole for my Peavy, and the list goes on!
Reason 8: Community Engagement
In today’s fast-paced world, finding meaningful ways to connect with others is a challenge.
By sharing this post and the subsequent videos of the build, we get to build the bench together.
You have the opportunity to comment, make suggestions, and get ideas for your own build.
Conclusion
I’m halfway through building a Rex Krueger Minimum Timber Bench in the woods of the UP.
This project embodies simplicity, sustainability, cost-effectiveness, and customization opportunities.
I also get to use some of my woodworking skills and employ many of my vintage hand tools. Let’s face it. I need to practice using them.
This bench is durable and stands the best chance of surviving harsh weather conditions of the UP while giving me options for portability.
I encourage you to check out the plans Rex Krueger offers on his site.
They are a great way to save time and money, plus, they are highly functional and practical.
This build fits right into my mantra of “Simple Life, Simpler Living.”
An update on the operations, developments, and plans for 2023.
A month longer than planned, Maycee and I long for the 2023 return to Michigan’s Upper Peninsula.
In 2023, we tent camped for 13 weeks and 4 days on my dad’s 40 acres of rural forest land near Marquette, the largest city in the Upper Peninsula of Michigan. Twenty-four thousand people live in Marquette.
Upon making our return, we will resume our off-grid living adventures. Our time there is anything but a typical Upper Peninsula Michigan vacation.
We don’t spend a great amount of time visiting Upper Peninsula attractions. Of course, other than the ones in the Marquette area.
No matter though. If you check out my YouTube channel you’ll see we have plenty of adventure on our own.
The longer we are away the higher the level of “overwhelm” I feel increases.
Many things delay the road trip to the UP at present.
These include:
Finishing the overhaul of donaldjclaxton.com
Editing several YouTube videos from last year’s video cache
Finishing repair or making of timber frame tools we’ll need when we get there.
Developing some plans to use for timber frame projects to do this year.
Figuring out better ways to supply power and water to our new site in the woods.
Getting packed and on the road.
Ugh! But what about more words on the page?!
These activities also include generating a massive amount of content before we go to the UP.
I need four more iterations of myself to tie up presentations, tools, and more.
Let me rephrase that. I need four or five others who know much more than me, to work things into shape!
Donald J. Claxton emoji with me at one of my Macs, overhauling donaldjclaxton.com and creating feverishly; until there’s a distraction! Then the offender gets a special look as I continue to prepare for a return trip to the UP.
Overhauling donaldjclaxton.com by using Divi and WordPress tools.
My family and friends as me what I’m doing today: the answer is always the same of late.
I’m working on the website.
Learning new ways to use the Divi Builder.
In the last month and a half, I’ve learned that many things I was attempting to do with the site were wasting my time.
Many aspects of the Divi Theme Builder, made by Elegant Themes, improved over the last year.
Many of them while Maycee and I were out in the woods. (Disclosure: This link to Elegant Themes website is an affiliate link. If you buy Divi, I may receive compensation from the company at no expense to you.)
This, while the ironic point is, has not been, “easy.”
As with off-grid life, completing one thing requires finishing 20 or 30 more before the intended task.
YouTubers who focus on Divi.
But I have learned much from each of the following YouTubers. Thank you to all, you’ve been so very helpful.
Each YouTube channel will help you get your head around advancements to the Divi Builder.
Speaking of YouTube…
Here’s how to watch last year’s videos from the UP.
Last summer brought an increase in subscribers to my YouTube Channel @DonaldjClaxton.
While overwintering in the South, I thought there’d be much more time to get to the catalog of raw clips needing editing and posting.
Unfortunately, between learning all I can about as much as I could, I’ve not gotten to them yet! But they’re coming.
This summer, I’ll also be adding drone footage from above the trees. (Get an FCC Remote Pilot License aka Part 107 Certificate, and practice flying the thing!)
Timber frame vintage hand tools repair, sharpening, and making
Before going to the woods for the first time in years last summer, I spent an insane number of hours watching Canadian YouTuber Shawn James on his personal channel and on “My Self-Reliance.”
This also included binge-watching Trustin Timber and his Canadian modular log cabin build.
To his credit, I’ve emailed Trustin twice and he’s responded in about five minutes each time. I appreciate him making himself available like this. I really, really do.
My 2023 timber frame plans
Over the last six months, viewership of other channels has taught me so much about building timber frame shelters and small projects.
This also has led to finding vintage hand tools via eBay and at any flea market I pass.
I’ve saved tons on buying from these sources.
Tons, I tell ya!
Mr. Chickadee, the best YouTube to watch to learn about timber framing.
Hands down, the best, rugged force in building timber frame anything(s), is Mr. Chickadee. He is an ex-US Marine who moved from California with his wife to a small farm in Kentucky.
This ex-Marine has read every how-to book there must be on the art and skill of timber framing.
Sure, there are commercial enterprises out there offering incredible services, but just as Shawn James and Trustin Timber et al. are you there specializing in building log cabins, Mr. Chickadee rules the roost as far as I’m concerned. Millions of others seem to agree, too.
Mr. Chickadee includes techniques he’s learned and studied by the Japanese, Chinese, and Koreans.
Know how to do a “kerf to the pith” to keep timbers from cracking or checking as the green wood dries out?
He is the only one I’ve found in hours and hours of searching who even knows, and teaches, how to construct one, and he doesn’t even include it on his own channel!
This is not an exaggeration. And it’s the solution to a lot of problems.
What is a kerf to the pith?
Mr. Chickadee claims it is a practice from Southwest Asia. One that’s quite old.
You may not also know that there are structures in Japan, China, and Korea that have stood the test of time.
Estimates say they are 1,300 years old and likely will survive at least another 800 years.
In a nutshell, a “kerf to the pith” is a 3/4’s-inch cut in the southern face of a timber beam or post, that creates a channel for moisture to escape and not cause structural integrity or cosmetic appearances of the wood.
On a tour of the property he teaches on, Mr. Chickadee points this out, almost as an “Oh, by the way.”
But this is a BIG deal for anyone whose cut wet timber and tried to do something with it.
In fact, many local ordinances across the United States prohibit the use of wood that has a large moisture content.
Why?
Because as wet wood, aka, greenwood, ages, the fibers shrink and also may twist.
This cut to the pith of the wood provides a place for the sap and water in a timber post or beam to evaporate out of the wood near the same rate as the wood on the outside.
A kerf to the pitch reduces the chance of cracks and checking happening in large timber posts and beams.
My vintage hand tools collection.
I’ve tapped into a gold mine of treasures in regard to collecting, restoring, and using vintage hand tools.
This includes:
Chisels
Hatchets
Peavey or Kant head–just need to cut a piece of oak when I get to the UP and fashion it to fit
Planes
Saws
All of them are well over 60 years old and in all probability, closing in or exceeding 100 years.
You see, in the woods, there aren’t all that many trees one can plug into and receive power from. And, to boot, as far off the beaten path our camp sits, there are no power lines either.
So in large part, what I use out there is hand tools. And we all know today’s made-in-China tools aren’t built to last 10 minutes.
Steel and iron may be a lot heavier, but the tools I have weathered time well.
Creating plans for the planned projects for this year.
The summer of 2022 in the UP became a lesson and reminder of what I didn’t know about what I didn’t know.
Maybe you have discovered times in your life when you’ve faced this, too.
We drove into the woods last summer with limited tools and resources. We made good and survived for 13 weeks and four days.
In 2023, I expect to find write the next chapters of “More About What You Don’t Know About What You Don’t Know.”
2023 Plans
Last year I found the top of a steep grade where it’d be nice to camp and enjoy the summers.
My plans this year include doing more to establish this site.
These include:
Sheds that measure 12′ x 16′ because they do not require permits to add out there in the woods.
An outdoor kitchen
A shower house
Rainwater capture system
Expanded solar and electric capabilities
Some semblance of a garden
Perimeter fencing to keep Maycee in and bears, deer, rodents, and uninvited humans out.
We did without these things last year.
As John Lennon once sang as a member of The Beatles, “Not a second time….”
What to do about off-grid power, water, and waste management.
As I mentioned above, the elephant in the woods comes in the shape of these three elements.
UP power sources in the woods.
Last year we began with absolutely no solar last year.
None.
By the end of the summer, we were using a 300 Watt power portable inverter. This absolutely saved the day.
But I’ve been using the Renogy power needs calculator and come to realize that to do most of what I “need” out in the wood puts me somewhere at 5000 Watt-hours per day.
In essence, that means having a bank of some 50 solar panels to even get close!
That’s not about to happen either.
This means complementing the power load with additional sources–wind, hydro, and thermal.
Going in this direction also gets tricky because these other sources generate electricity differently from solar.
What I’m saying is you don’t walk out into the woods, plop down a wind turbine, dangle a few wires from a pole, and connect them to the same box that’s feeding a 300 Watt inverter.
So, I’m completing my plans for how to make this work.
Water sources in the woods of the UP
Water is one of the four basic needs of human and dog life.
Last summer, I made a habit of buying more water each time we ventured into Marquette, Michigan, a fair drive from our remote location.
On average, I kept a minimum of 10 gallons on hand at all times.
That worked for me and Maycee, but this also created limitations.
A couple of times I was able to “shower” by standing out in the rain and giving myself a wash.
Rainwater, even in the summer in the UP, doesn’t get all that hot.
2023 hydration and irrigation plans
Thanks to Katie and Greg from This Off-Grid Life on YouTube, I learned this winter about “ram pumps.”
Katie mentioned that they had seen a video from a family in Panama using one. This led to watching multiple videos of The Nomadic Movement.
How ram pumps work.
It’s a matter of physics, but basically, hydraulic pressure, free from the need for electricity, pushes captured running water high up a hill and over crazy terrain.
You can watch the video below for more. They’re not expensive to build, PVC pipe and hoses are probably the greatest costs.
Aside from the shameless sexual exploitation of this married mom’s nipples, (yesterday morning was a thumbnail of her in purple leggings that featured every nanometer of the place God split her), their ram pump worked and delivers water uphill. If Little Red Riding Hood’s grandma lived in their house in Panama, (not Florida) this would give new meaning to the phrase, “Over the river and through the woods….”
That was a cool video, where do I buy a ram pump and how much are they?
The DIY ram pump in The Nomadic Movement‘s video costs somewhere around $130 US to build. (Seriously, y’all down in Panama, I’m sickened by the regular vulgar exploitation of your wife, Kaylee. Stop it.)
eBay has various-priced ram pumps for sale, pre-made.
This would be a plug-and-play deal, with a little bit of work.
A couple of springs on the land in the Upper Peninsula would lend to this project.
How close they are to the hill remains to be seen. At one point, I calculated that it was 1,400 feet from one spring I located last year.
I need to find springs closer to the hill if I go in this direction.
The 2023 waste management plan
This goes beyond packing one’s trash.
Yes, I packed our trash and hauled it out.
But aside from walking around with a little trowel all the time for other wastes, well, one of the first things to do upon arrival is to construct a compost toilet.
There are still a few issues to resolve, but for the urine converter, I’ve found a couple of alternatives that will work, for free.
Getting packed and on the road.
Like most living off the grid, I’m loading as much as possible into tubs and wooden crates.
This will make them easier, and more difficult, to all load into my Chevy Traverse.
What won’t cram into one of the containers will stay rolled up or folded and then crammed into gaps.
The critical part is leaving and having enough room in the back for Her Majesty, Maycee Grace.
Maycee is on the large side of most Great Pyrenees. So she takes up about 8 cubic feet, at the least, in the back. If only I could strap her onto the car’s top!
We’ll get things loaded, but it’s going to take some tier-building and effort.
To Conclude
I look forward to leaving the hot and muggy South behind and our return trip to the UP.
My “To Do” list shortens, and then just as many, and more items, appear.
The other day I told Maycee I’m going to reach a point real soon when I rip the scab off, and northward we will be on the way to the UP.
My chores will get done; Not in my time, but in God’s.
Here I witness to you. Since my back injury in May 2016, God has taught me much about patience.
That things happen in his time, not mine.
Many of us seem to find learning to “let go, and let God,” difficult.
A blurred line often exists between “reasonable” and “going too far” with the concept.
Google Bard v. Open.ai’s ChatGPT Advice.
Last Thursday I gave my list of to-dos to the task managers available in Google’s Bard and ChatGPT.
Rest assured, this article was not written by generative artificial intelligence. No, not one word.
I’ve experimented with these products a great deal in 2023. More to follow about this, too.
My point is, however, I’m working my lists in the order of importance suggested by each large language model.
Thanks for reading. Please join my email list, you’ll see a signup form in the footer below.
I look forward to getting to the UP and getting busy.
Woodcarving safety means always wearing a woodcarving glove and not carving when you’re tired
From a lack of woodcarving safety, last night, one cut too many before going to bed, fatigue, a dulled blade, and no safety glove led to two bad cuts on my fingers. My disregard for several important woodcarving safety rules should have led me to a local ER. But some important first-aid techniques have so far kept me from getting stitches.
This post is meant to serve as a helpful reminder to help you avoid similar mistakes.
When it comes to woodcarving, safety is key; but let’s be real, newer carvers like myself often disregard a good glove and suffer those little slips that make our hearts skip a beat!
Whether you are just starting out in the world of whittling or a seasoned pro at creating delightful wooden pieces – there are essential safety measures to follow. As Gene Messer oft says, “In other words,” you should keep these safety measures at your fingertips if you want to keep your fingertips.
Safety First – Always wear protective gloves and safety goggles before you start carving
Last night, YouTube carvers were on the TV while I did my evening recliner carving spree. I’m working on a modified Harley Refsal carrot to sell as place makers for Easter dinner table settings.
Almost three hours in, I’d carved almost a dozen carrots and switched to work a little on a 2″ x 2″ x 6″ basswood Easter Bunny I’ve been working on in my “spare time.”
After hundreds of cuts, one slip while trying to cut out bunny ears, I ended up with a gnarly cut on two left-hand fingers.
Literally, a bloody mess.
Is there a moral to this woeful story? Something I can point to? (Pun intended.)
You bet your life there is.
Always wear a protective glove while carving basswood
You may think, “Heck, woodcarving gloved are for newbies. Doug Linker and Gene Messer don’t wear gloves when they carve for YouTube, so why should I?”
One, you’re not either one of them, and there are dozens of videos where they have on gloves. Maybe they don’t wear them so much for making videos, but like most carvers, they have aversions to cutting their fingers. You should, too.
Second, there are okay gloved and then there is kevlar.
A particular point to make regardless is that safety gloves are meant for stopping accidental swipe cuts. But point a 1-3/4s razor-sharp tip of a knife into almost anything and the tool is going to make a hole.
Now I don’t own a kevlar glove, yet. But I’m ordering one today. Kevlar is the stuff the Secret Service uses to stop bullets. But is it worth trying to see if a bullet-proof substance will stop a knife blade?
I’m not in any rush to try and find out.
What to look for when selecting a carving glove
When it comes to carving, a good carving glove can mean the difference between success and a trip to the emergency room.
So, what should you be looking for when selecting a carving glove? First and foremost, make sure it’s made from durable materials that can withstand the rigors of cutting through a hard piece of basswood.
Second, ensure that it fits snugly on your hand to prevent any slippage. Often my index and middle lefthand fingers are also wrapped in carving gauze tape for extra protection.
Last night my hands were exposed; no glove, no tape.
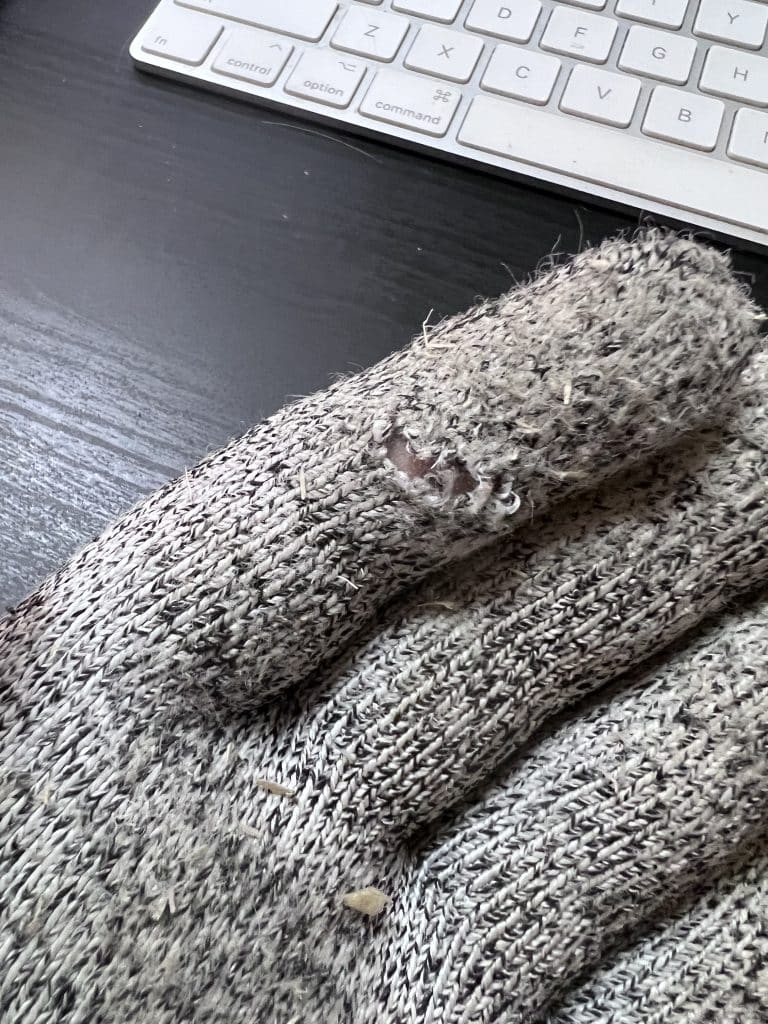
This inexpensive glove I bought last fall is not safe enough for me. As you can see, I’ve cut several holes in it since October.
I bought this woodcarving safety glove last fall. Already, it’s gotten cut up. It’s time to upgrade to one made of Kevlar.
Take a Break – Don’t attempt to carve for long periods of time
The importance of taking a break cannot be overstated.
Temptation often leads carvers to dive headfirst into a carving project, staying up all night until it’s complete.
This is a recipe for disaster.
You don’t want to end up with a half-finished carving that looks like it was attacked by a toddler with a butter knife.
So, take a breather! If you’re wearing your Apple Watch, heed the hourly notifications to stand up for at least three minutes each hour.
Do some stretches. Make a cup of tea or coffee. I turn to YouTube on my Apple TV and binge-watch Linker, Messer, et al. woodcarving episodes. The night before last it was a channel of The Beatles.
Take a break and your carving skills will thank you for it.
Plus, what creative doesn’t love a good excuse to procrastinate?
Use Sharp Tools – Dull tools take longer to use, and are more dangerous than sharp ones
Here’s some sound advice: never use dull tools!
Not only do they make the task at hand a total drag, but they also become quite dangerous.
Try slicing through a tough steak with a butter knife – it’s a recipe for accidental self-harm.
The same goes for woodcarving knives, gouges, V-tools, and other sharp objects.
You might think you’re saving money by avoiding sharpening your tools.
However, there is no substitute for a well-stropped tool.
The last thing you want is to end up with a gnarly cut because you got lazy and failed to keep your tools sharp.
Keep It Simple – Stick to basic shapes and avoid intricate designs until you have more experience with woodcarving
Woodcarving can be a delightful hobby, filled with the satisfaction of creating something beautiful from a piece of raw wood.
While you’re still a beginner, however, stick to simple and small projects. These help you hone your cuts. Ones where you’re not carving at an angle while roughing out a nose. Where you need to cut in straight and deep.
The intricate designs may look appealing, but attempting a complicated shape before you are ready can lead to a pile of sawdust, frustration, and cuts in your hand, not the basswood.
Think of this like playing the piano. You start out with scales and teach your hands to do differing patterns while doing scales.
You don’t start out with Bach’s fugues, Beethoven’s sonatas, or 64th-notes by Liszt.
Woodcarving is an experience that relaxes the soul. Often, the simplest designs have the most beauty. As you progress, increase your level of difficulty.
This is when you work into Bach’s Well-tempered Clavier or Beethoven’s Moonlight Sonata.
Liszt? Find a piano channel on SiriusXM or iTunes and listen; unless you’re the Eddie Van Halen of the piano….
My plan of action for dangerous cuts
Having a plan of action for dangerous cuts is as important as picking out a good knife to purchase.
Common sense, basic first-aid, and a few key products are critical to keep on hand while carving.
First off, always remember that fingers are not meant to be used as cutting boards.
Second, invest in quality tools and keep them sharp; good tools really are not that expensive and you only need a few to get started.
Dull blades are the most dangerous part of woodcarving. They make for sloppy cuts and increase the chances of slips and injuries.
Never underestimate the importance of protective gear. Gloves may not look sexy, but they’ll keep your hands safer in case of accidents.
Keep a first-aid kit at the ready. What should you have in one at the bare minimum?
Donald J. Claxton’s first-aid kit
My first-aid kit includes Bleed Stop. I also keep Neosporin, New Skin, band-aids, gauze, and tape handy, too.
When I suffer a cut, the first thing I do is keep calm and grab the place I’ve cut with my other hand and apply direct pressure. Once I can grab a paper towel or clean wash rag, I cover the wound, reapply direct pressure, and then lift my hand above my head to slow the blood flow.
As soon as I can pour cool water into the cut to flush it out, I do. Most often, maintaining direct pressure on the wound while it’s under the water is necessary, too.
When blood is no longer flowing like rapids, I apply Neosporin and get it into the cut to kill any bacteria and hopefully avoid an infection.
If it is still bleeding like it was, I’ve reached a fork in the road. Fix it at home or go to the ER.
So far, I’ve been lucky enough to not require a ride to an urgent care facility or ER. But if you need to go to one, don’t hesitate.
My cuts, thankfully, have not gone too deep into the skin. Yes, they’ve been bloody as hell, but I’ve gotten the blood to stop gushing using the methods above.
But for a cut that’s a little deeper, but not quite deep enough for an emergency run, I wash the cut further, getting the Neosporin washed out, and then I’ve used “New Skin,” a product that stings going on, but helps begin making synthetic skin in order to seal a cut.
Last night I debated using the ultimate over-the-counter product, Bleed Stop, but the New Skin did the job.
Bleed Stop
My friend Joel Porter, a former Scoutmaster, told me when I cut my hand in Upper Michigan last summer about Bleed Stop.
Four packages come in a box. I keep one in my briefcase bag, one in the drawer beside where I sit and carve in the recliner, one in the console of the car, and the fourth in a mini-first-aid kit that’s next to my carving desk.
The box says Bleed Stop is used in operating rooms to stop wounds that won’t stop bleeding. You tear open the packet and then dump it onto your wound. This is supposed to make your blood coagulate and stop the bleeding. Thankfully, I’ve not ever needed to take this step, but I keep the product close at all times.
Did I mention I’m also on blood thinners? Yes, so this stuff is extra important.
Woodcarving safety can mean the difference between a truly rewarding experience and cutting your fingers to pieces. Here are five woodcarving safety measures to keep in mind:
Woodcarving safety must include always putting your safety first. Start with the right gloves and sharp, well-stropped tools.
Don’t skip the fundamentals.
Always use sharpened tools — dull ones can be more dangerous to your wood carving and yourself.
And remember, have a plan for an accident—they will happen—and keep the first-aid kit close by when you carve.
Having a plan for dangerous wounds will provide an important advantage for your safety.
In other words, save your own version of the Statue of David for Week 2 or 3. Maybe even year 5 or 6. Maybe.
What other safety measures do you practice while carving basswood?
Custom crosses and woodcarvings: In time for Easter
The time for the market has been changed from 8 a.m. – 1 p.m. to 12 noon – 4 p.m.
Provided the weather cooperates, the event runs from 8 a.m. to 1 p.m. at the Cornerstone Christian Church located at 301 Dalraida Road, Montgomery, AL 36109.
Find my custom crosses, and Easter-themed carvings in lucky Booth #9
You can find me at Booth #9 where I’ll be selling my custom crosses and Easter-themed woodcarvings.
Custom crosses are better than cookie-cutter big-box store options
On-site, there will be many options for custom crosses to choose from. This includes finishes, bindings, and the wood each cross is made with. Your options include:
Maple
Oak
Pine (Balsam Fir)
Cross Reverence
All timber is sourced from family land deep in the woods of the Upper Peninsula of Michigan; less than 15 miles from Lake Superior. Likewise, each piece of wood is carefully chosen based on its size, quality, and character.
A great deal of reverence is poured into the design and assembly of every cross.
Each is hand-crafted to create a unique piece that stands out from standard big box-store plank wood or hard-plastic crosses.
Larger than 12 inches–Depends on the size, but the largest available includes a 22″ balsam fir and 14″-20″ maple and oak crosses.
Great gifts
These crosses make great gifts for:
Baptisms
Christenings
Coworkers
Family
Friends
Pastors, missionaries, and ministers
Prayer group members
Teachers
Yourself
Easter-themed woodcarvings
During this event, I also will offer basswood carvings of:
Easter Bunny hutch front doors
Colorful hand-carved basswood carrots to use as Easter dinner table place markers. (Sets of 4–$30 and 6 carrots–$35)
The Easter Bunny in 4 and 6 inched form
Don’t be surprised if you find a few gnomes and mushroom houses, too!
Like the crosses, all woodcarvings are perfect for Easter as decor or gifts.
Email list registration and entering to win a free Balsam Fir Cross
Email list registration and entering to win a free cross
For those who fill out an email list information card when they arrive at Booth #9–this enables you to get advanced notice about future products.
Plus, filling out a card and getting a drawing ticket qualifies you for a chance to win a free cross giveaway! The drawing will happen at 12:45 p.m. Saturday, you need not be present to win.
Everyone is welcome at this family-friendly event, so make sure to stop by Booth #9 for my beautiful custom crosses and woodcarvings.
Payment options
Payment options include cash, Stripe, PayPal.me, Venmo, and Zelle.
Like the Cornerstone Handcraft Market Facebook Page
Please follow the link to the Cornerstone Handcraft Market page on Facebook. There you can learn more about the other vendors and stay abreast of the situation concerning the weather.
Don’t forget to check out DonaldJClaxton.com. (Much of the site is still under construction, but more on that later.) For more information about my product lines–coming soon to Etsy!
See y’all Saturday at Booth #9 of the Cornerstone Handcraft Market!
Ready for Christmas: See Santa’s Sleigh and workshop beginning Nov. 27, 2009.
Are you ready for Christmas?
Oh my gosh, we’ve gone overboard this year in our Christmas decorating.
Without reservation, I assure you we are the only house in miles that has its own, classic-looking Santa’s Sleigh.
We’re getting closer to being ready for the Nov. 27 arrival of Santa Claus at our house in Balch Springs, TX.
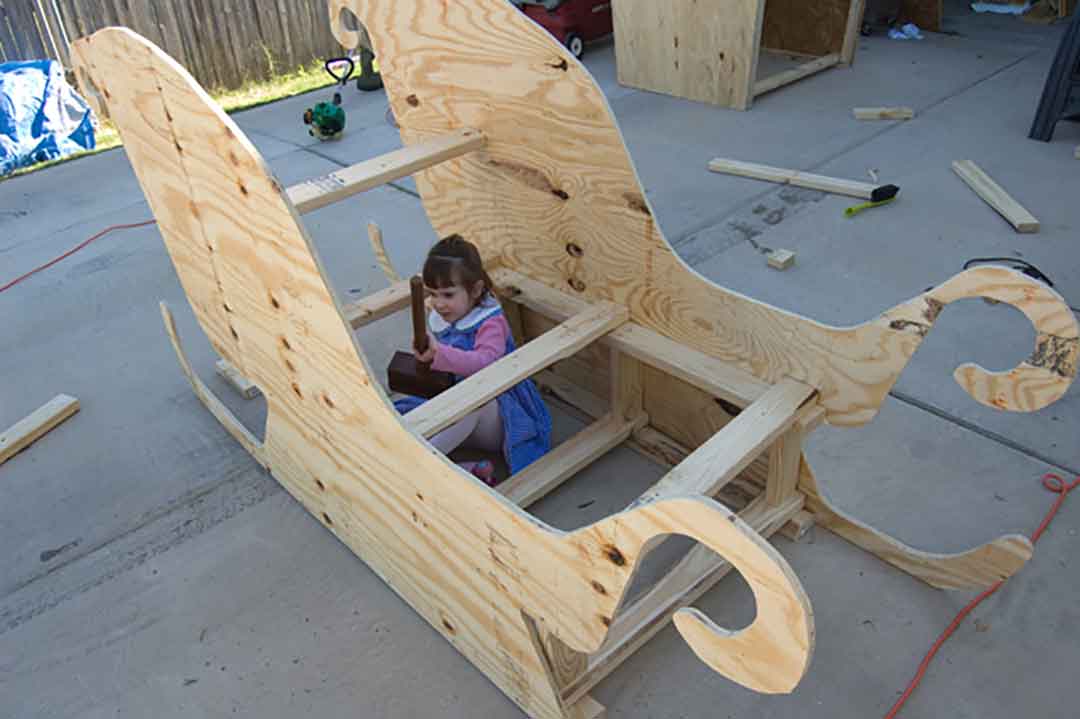
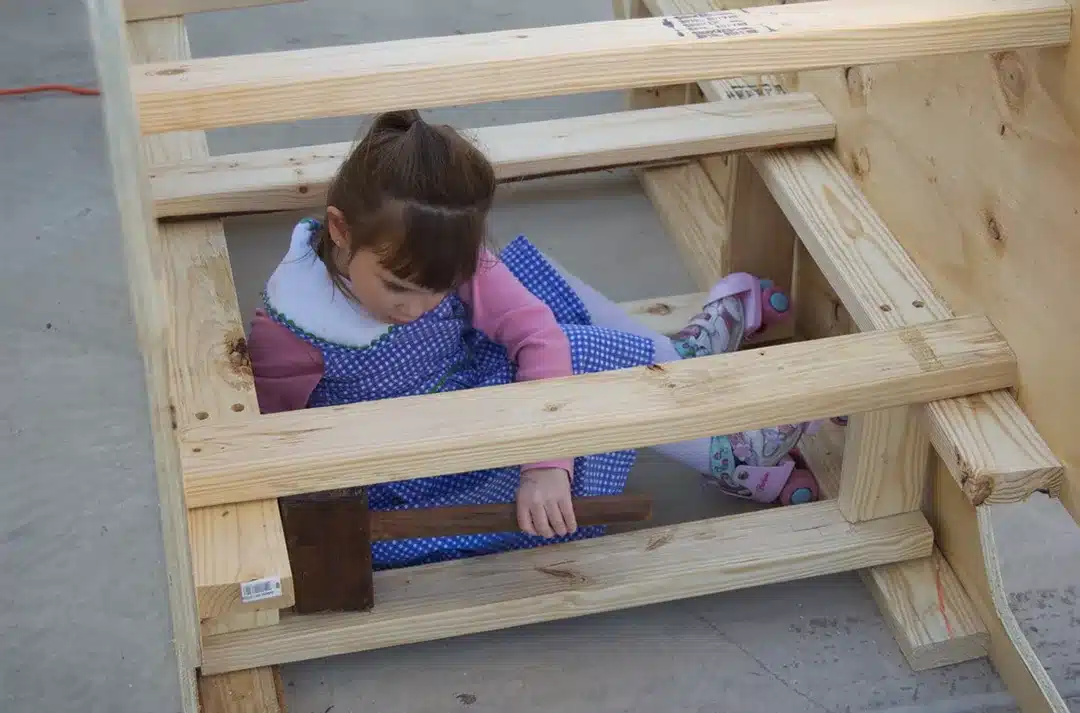
This weekend, Ashleigh, 5, helped me with retouches on the Santa’s Sleigh we built in late 2008.
Our Elves are busy, busy, busy getting ready for Christmas 2009!
We have much work to do to be ready for the 27th!
It’s a busy time at our house.
This keeps things fun and the excitement building.
This past weekend I put up a canopy of lights over our swimming pool and added other festive decorations in the backyard.
Check out EA SPORTS Active for the Wii.
This week we’re also starting a new workout program with EA SPORTS Active using “More Workouts,” their new product that goes on sale tomorrow, Nov. 17.
The Balch Springs Santa Cop program is ready for Christmas!
Don’t forget our big priority for Christmas 2009–supporting the Balch Springs Police Department’s 23rd annual Santa Cop program.
We encourage those who come to see Santa also to bring an unwrapped toy, gift certificate, etc. we will present to the police department.
They will provide Balch Springs children whose parents cannot afford Christmas presents for their children this year.
This helped about 150 area families last year.
We’re hoping to assist even more in 2009.
Stop back soon as we continue to get ready for Christmas 2009.
Several readers expressed interest in how I built the Santa Sleigh and the Santa Workshop in time for Christmas.
Since I was a child, I’ve loved the five following treasures and events:
The woods of the Upper Peninsula of Michigan and the UP’s long, cold, snowy winters.
Woodworking projects of all shapes and sizes.
Activities that give me the opportunity to make a difference in the lives of others.
Bringing smiles to those around us and helping others in need.
A white Christmas!
The Santa Sleigh, Santa Workshop, and Christmas 2008
I never drew a set of plants to make the Santa Sleigh in 2008, but future me thinks that’s not a bad idea!
The great thing about the Santa Workshop is it will double as a doll house for my four-year-old.
Given the situation with the weather, spring, and summer feel right around the corner here in North Texas in late 2008.
And unfortunately, a white Christmas seems unlikely.
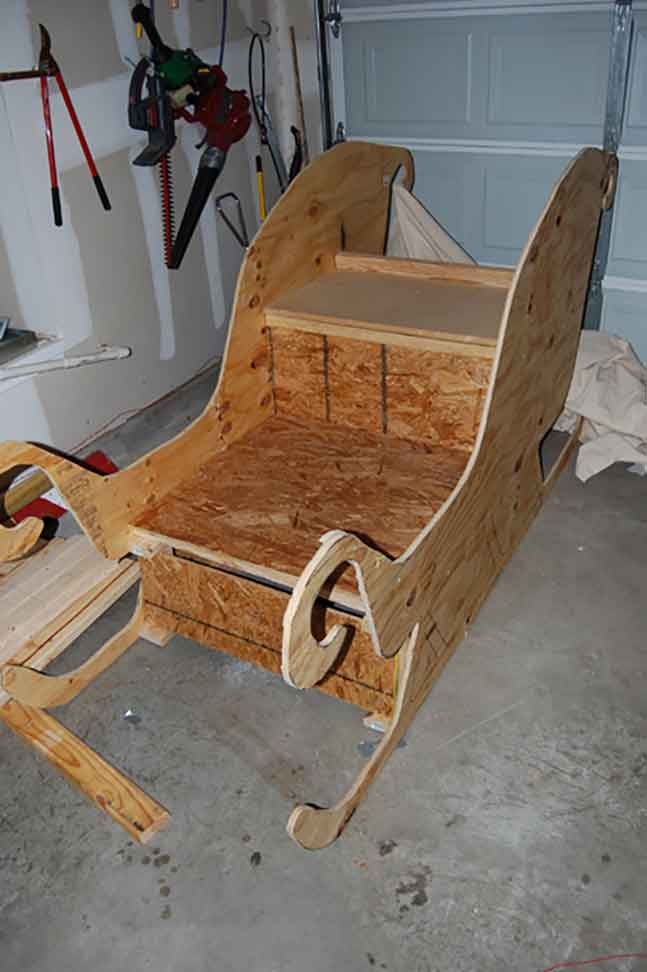
Building the Santa Sleigh in my garage.
Supplies I used to make the Santa Sleigh and Santa Workshop.
I approached these two projects with the idea of making them easy to disassemble come January 2009.
This means the build uses 1-3/4-inch and 2-1/2-inch outdoor screws for assembly.
I bought a 3/4-inch 4-foot by 8-foot piece of ply for each side of the Santa Sleigh and another for the front of the Santa Workshop.
For the sides and the roof of the workshop, I bought 1/2-inch roofing boards.
One sheet of MDB/MDG made the Santa Sleigh seat so Santa didn’t end up with a burr under his saddle, aka., splinters in uncomfy places.
An image of my Santa Sleigh from the rear of the design. The body is framed with 2″ x 4″s and the facade is ply and MDB.
Making a Santa Sleigh without a pattern.
To make the Santa Sleigh design, my imagination took over when I picked up a pencil and a four-foot level.
(Again, Future Me is telling me 14 years later that I should draw out the plans….)
My 4-foot level helped as a long straight edge for the Santa Sleigh skids.
A piece of wire used as a compass helped make the curves along the front vertical planes look round and smooth.
After designing and drawing out the shape of the Santa Sleigh, I used a Sharpie to make the results of cutting the sleigh’s body pleasing to the eye.
Cutting the Santa Sleigh facade parts.
To cut my design’s lines, I used a jigsaw as a circular saw, for obvious reasons, would not work.
Once I had the one piece cut, I simply laid out another 4-foot by eight-foot piece of plywood and set it on top, and traced the first piece.
About an hour I cut out both sides of the Santa Sleigh.
The Santa Sleigh frame
The skids have 2″ x 4-inch boards running front to back and across the floorboard to form the foundation for the rest of the frame.
The frame is strong enough so that “Santa” could rest on the seat along with a child and/or parent at the same time.
Building a series of tiers tied to the 2″ x 4″ x 54″ and 2″ x 4″ x 48″ framing makes the structure sound.
The Santa Sleigh framing inside view, complete with Ashleigh “helping” me build.
Supports for the frame ensure the solidness of the sleigh.
I added spacing with 2″ x 4″ supports 9-3/4″ apart, and additional supports between them at the front of the sleigh, the rear, and at the stress points, ensuring the sleigh will not going to fall apart any time soon.
The rear view of the Santa Sleigh should provide a better understanding.
Rear view of the 2008 Santa Sleigh build. This highlights the 2″ x 4″ framing inside.
The flooring for my 2008 Santa Sleigh build.
The Santa Sleigh flooring required a sheet of plywood braced by three 2″ x 4″ x 32″ spans across the sleigh.
This enabled the further strengthening of the sleigh by adding to the boxes for the seating.
The Santa Sleigh flooring and seating boxes strengthen the frame while also ensuring a place for Santa et al. to have a place to sit on the life-sized sleigh.
Building the front footplate for my Santa Sleigh.
Santa Sleigh cabin section, complete with flooring, front footplate, and gift bag area to the rear.
I built the front footplate and Santa’s backrest before sealing the back of the sleigh.
Again, all of this is screwed together, so in January the sleigh is storable after disassembly.
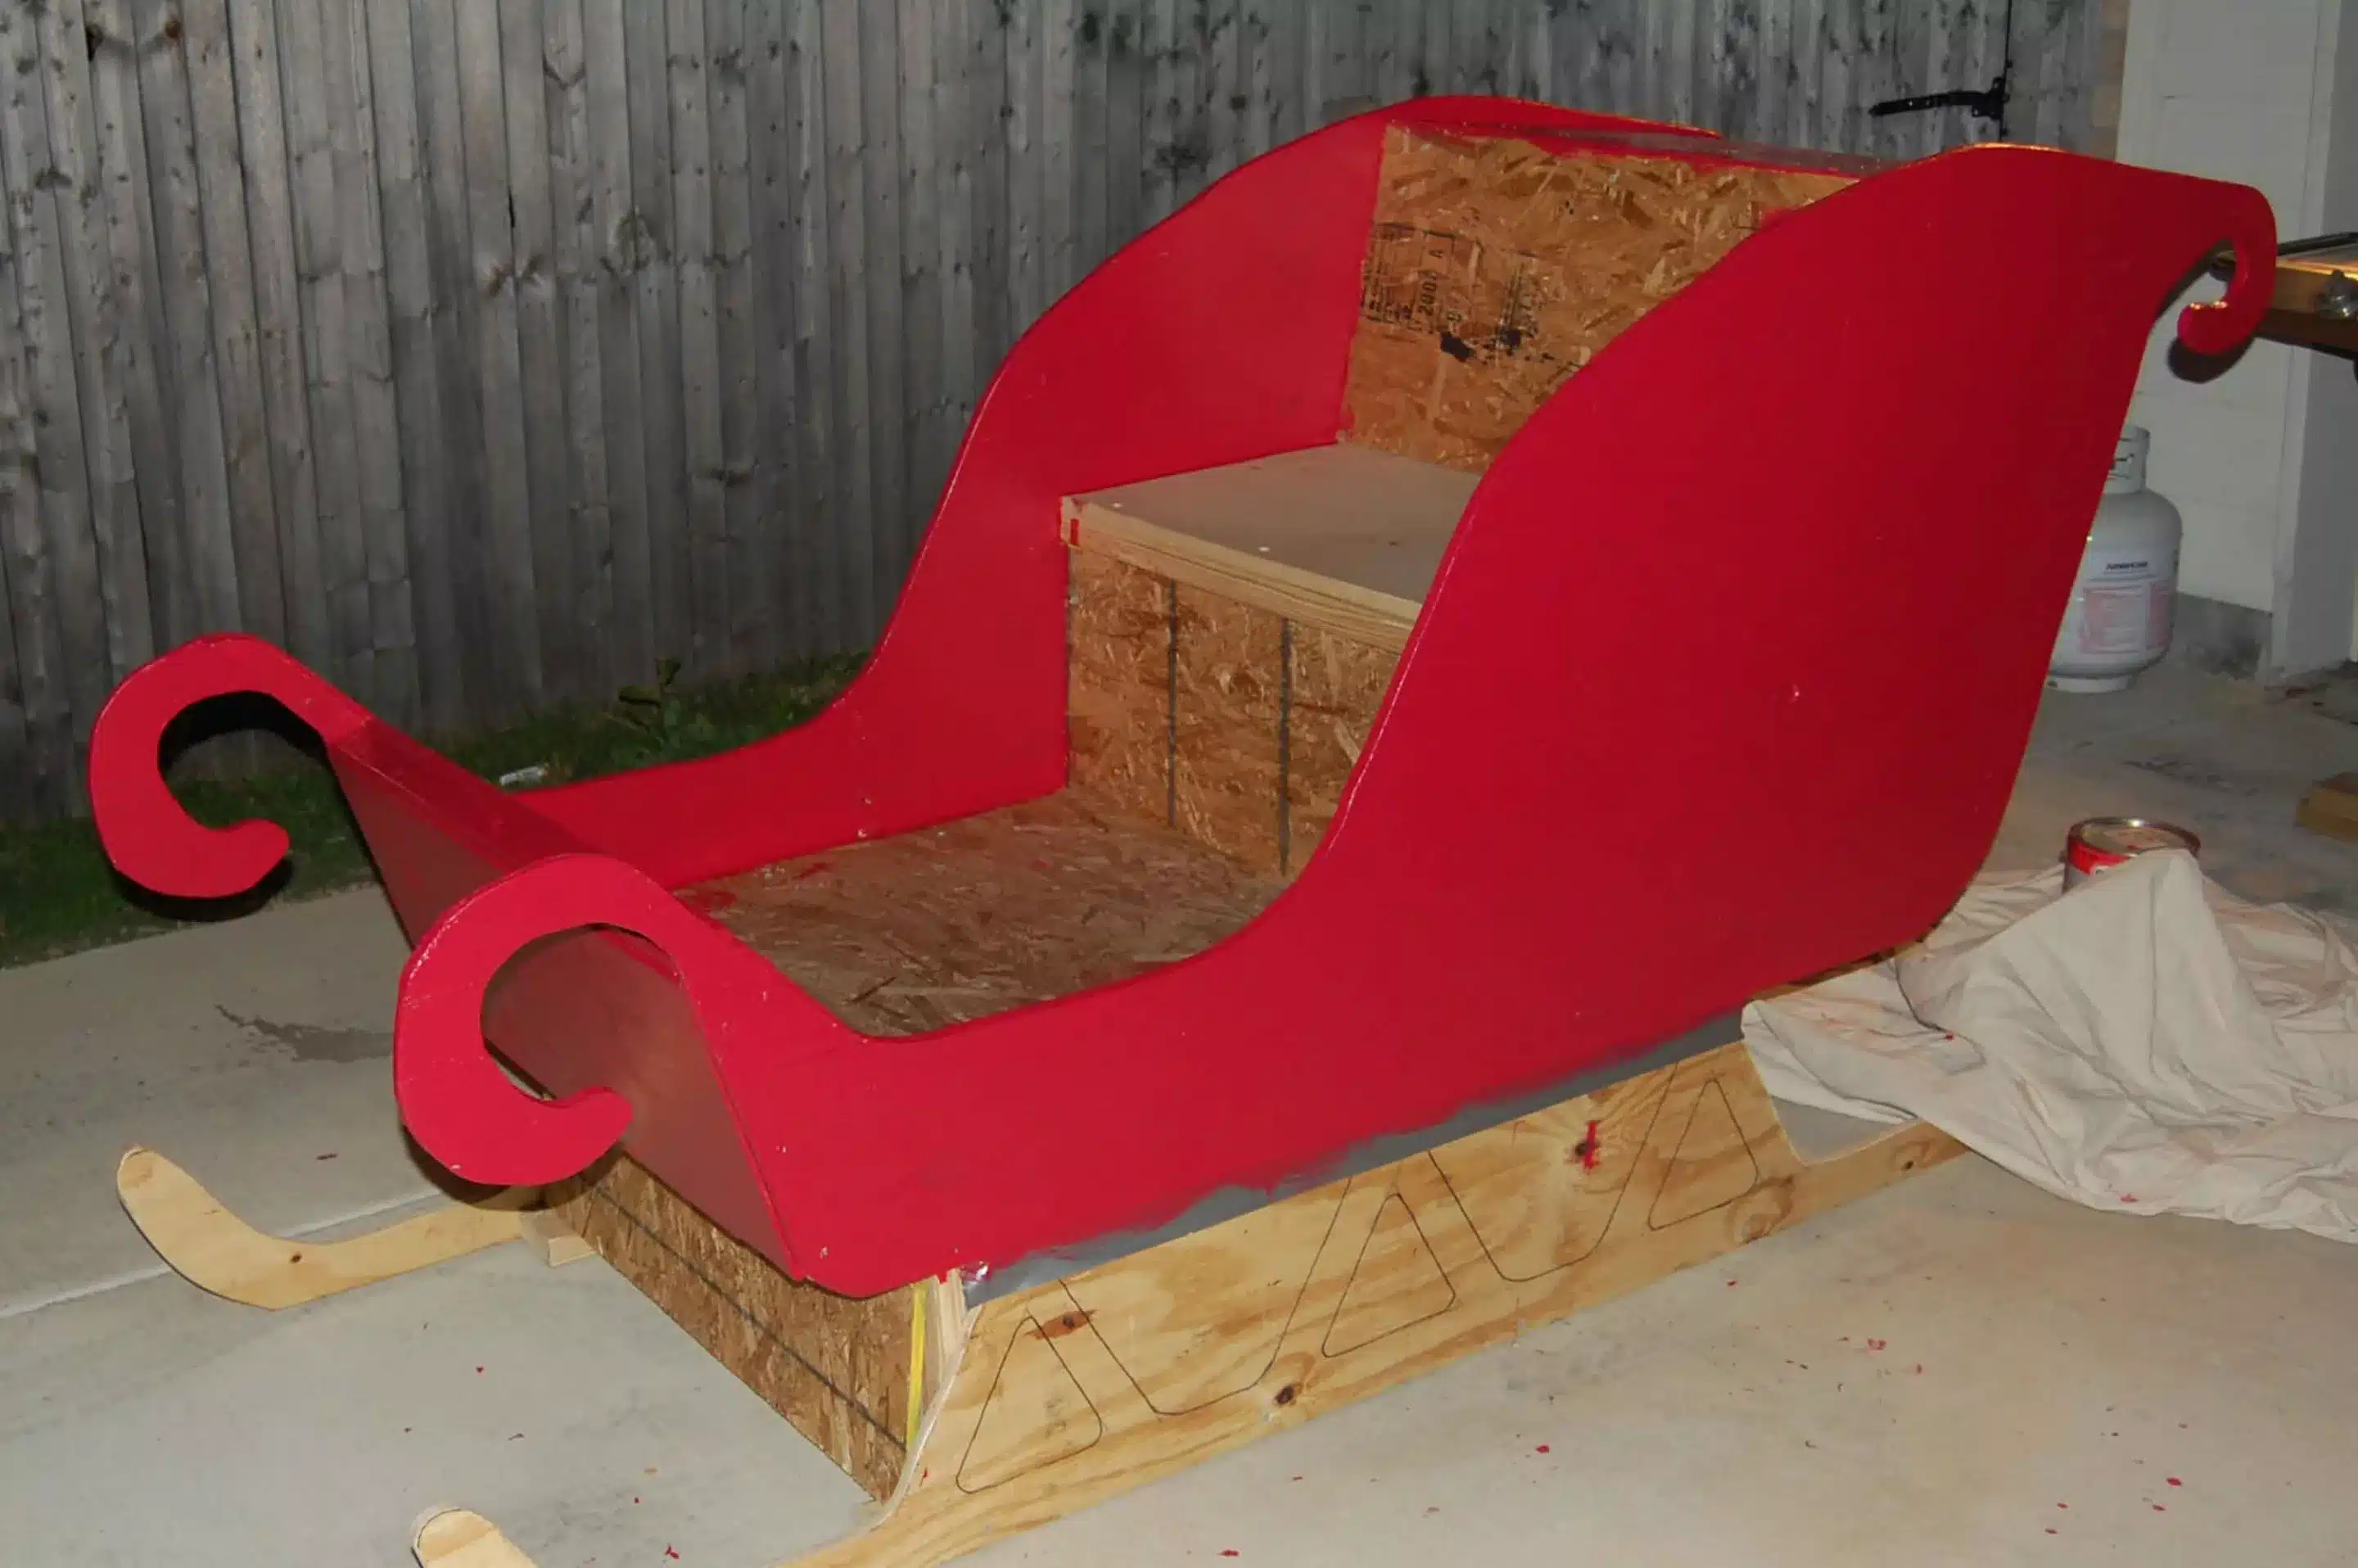
Painting the Santa Sleigh.
Again, I didn’t have a set of drawings for building the sleigh, and this applies to the way it’s painted, too.
We all know from historical references that Santa’s Sleigh is red.
Bright red.
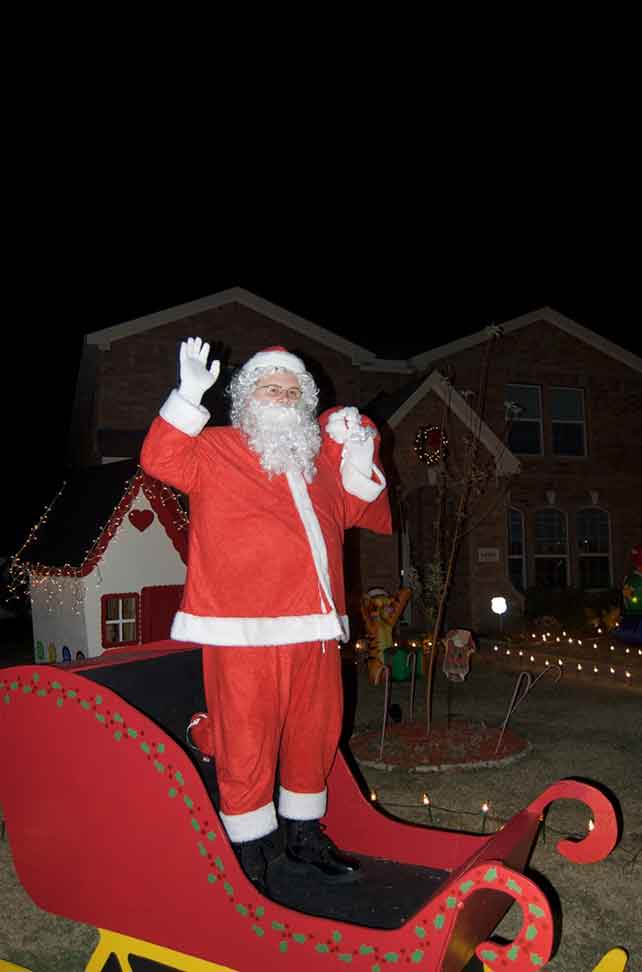
Applying the 60:30:10 rule of color design.
Santa Sleigh with Santa in it, demonstrating the 60:30: 10 rule of color design.
UPDATE 2023: I did not realize in 2008 this is what we did to paint our Santa Sleigh, but the 60:30:10 rule’s application works well.
This aspect of painting the sleigh came easy; not to mention the application of the 60:30:10 design rule for applying color.
Black became 30 percent of the color or in some proximate way.
The highlight color, naturally, yellow, implies something of a golden aura to what children view as magical.
SANTA’S WORKSHOP
Santa’s Workshop is really simple. I got a 4 x8 foot plyboard, went about 2/3s of the way up, and angled off to the middle for the top point.
Then I used a 48-inch wide section and then tapered it off as I dropped to the bottom of the board.
This gives the Santa Workshop a smaller size at the bottom frame.
The inside is made up of a simple square 2 x 4 frame, and then I ran the 2 x 4s up the side of the structure so that I could fasten the side walls to them.
Once I had the front and the back attached to the framing, I secured them with side beams.
The finer details of my Santa Workshop.
Once the floor was in, I drew the door and the panes for the windows on the front panel and used a jigsaw to cut them out.
I have some 2 x 4 boards I’m going to use to secure the roofing and plan to get 2 more 4 x 8 boards and run them lengthwise to make the roofing. I don’t think it will be 8 feet long though. I will let you know when I get to that point.
Photos are included to help you work your way through it all.
If you have any questions, don’t hesitate to send them via my contact form.
Of course, when I get the two items completed this weekend, they will be painted and trimmed out.
You can learn more about how I built Santa’s Sleigh from:
New Products in The Timberlander Treasures Gift Shop! Wooden custom crosses, Great Pyrenees t-shirts, The Timberlander merch, woodcarvings and more. You'll like what you find here! Dismiss